ScalaTags is a small, fast XML/HTML/CSS construction library for Scala that takes fragments in plain Scala code that look like this:
// import scalatags.Text.all._
// OR
// import scalatags.JsDom.all._
html(
  head(
    script(src:="..."),
    script(
      "alert('Hello World')"
    )
  ),
  body(
    div(
      h1(id:="title", "This is a title"),
      p("This is a big paragraph of text")
    )
  )
)
And turns them into HTML like this:
<html>
    <head>
        <script src="..."></script>
        <script>alert('Hello World')</script>
    </head>
    <body>
        <div>
            <h1 id="title">This is a title</h1>
            <p>This is a big paragraph of text</p>
        </div>
    </body>
</html>
This document should contain enough to get you started using Scalatags to start generating your HTML, whether on a web-server on in the browser using Scala.js. For more information checkout the:
ScalaTags is hosted on Maven Central; to get started, simply add the following to yourbuild.sbt:
libraryDependencies += "com.lihaoyi" %% "scalatags" % "0.8.2"
And you're good to go! Open up a sbt console and you can start working through the Examples, which should just work when copied and pasted into the console.
Scala.js
To use Scalatags with a ScalaJS project, add the following to the built.sbt of your ScalaJS project:
libraryDependencies += "com.lihaoyi" %%% "scalatags" % "0.8.2"
And you should be good to go generating HTML fragments in the browser! Scalatags has no dependencies, and so all the examples should work right off the bat whether run in Chrome, Firefox or Rhino. Scalatags 0.5.2 is currently only compatibly with ScalaJS 0.5.3+.
The core functionality of Scalatags is a tiny amount of code, and yet it provides all the functionality of large frameworks like Python's Jinja2 or C#'s Razor, and out-performs the competition by a large margin. It does this by leveraging the functionality of the Scala language to do almost everything, meaning you don't need to learn a second template pseudo-language just to stitch your HTML fragments together
Since ScalaTags is pure Scala, any editor that understands Scala will understand scalatags.Text. Not only do you get syntax highlighting, you also get code completion:

and Error Highlighting:

and in-editor documentation:
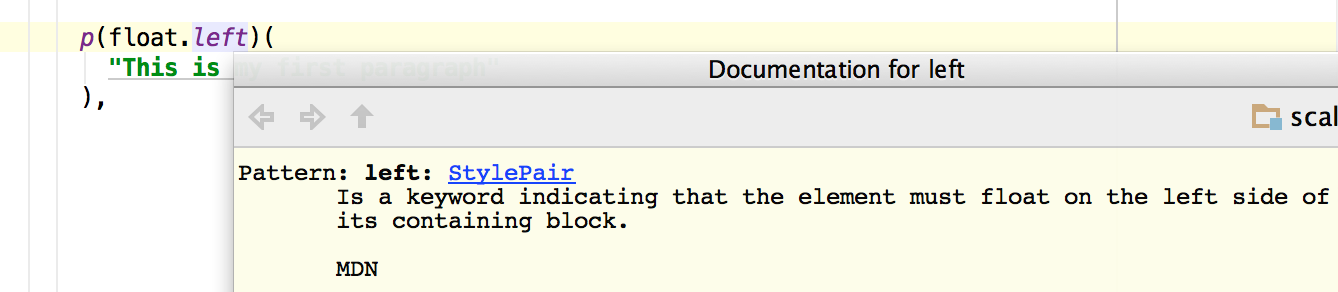
And all the other good things (jump to definition, extract method, etc.) you're used to in a statically typed language. No more digging around in templates which mess up the highlighting of your HTML editor, or waiting months for the correct plugin to materialize.
Take a look at the Prior Work section for a more detailed analysis of Scalatags in comparison to other popular libraries.
This is a bunch of simple examples to get you started using Scalatags. These examples are all in the unit tests, so feel free to click the links to see them in full. For more examples, take a look at the demo page, backed by the code in example/
Hello World
html(
  head(
    script("some script")
  ),
  body(
    h1("This is my title"),
    div(
      p("This is my first paragraph"),
      p("This is my second paragraph")
    )
  )
)
The core of Scalatags is a way to generate (X)HTML fragments using plain Scala. This is done by values such as head, script, and so on, which are automatically imported into your program when you import scalatags.Text.all._. See below if you want more fine-grained control over what's imported.
This example code creates a Scalatags fragment. We could do many things with a fragment: store it, return it, etc. since it's just a normal Scala value. Eventually, though, you will want to convert it into HTML. To do this, simply use:
frag.toString
Which will give you a String containing the HTML representation:
<html>
    <head>
        <script>some script</script>
    </head>
    <body>
        <h1>This is my title</h1>
        <div>
            <p>This is my first paragraph</p>
            <p>This is my second paragraph</p>
        </div>
    </body>
</html>
If you want to add a doctype to your HTML fragment, simply add it as a string:
"<!DOCTYPE html>" + html(
  ...
)
The following examples will simply show the initial Scalatag fragment and the final pretty-printed HTML, skipping the intermediate steps.
Attributes
html(
  head(
    script("some script")
  ),
  body(
    h1("This is my title"),
    div(
      p(onclick:="... do some js")(
        "This is my first paragraph"
      ),
      a(href:="www.google.com")(
        p("Goooogle")
      ),
      p(hidden)(
        "I am hidden"
      )
    )
  )
)
In Scalatags, each attribute has an associated value which can be used
to set it. This example shows how you set the onclick and
href attributes with the := operator. Attributes are all
instances of the Attr class. This prints:
<html>
    <head>
        <script>some script</script>
    </head>
    <body>
        <h1>This is my title</h1>
        <div>
            <p onclick="... do some js">
                This is my first paragraph</p>
            <a href="www.google.com">
                <p>Goooogle</p>
            </a>
            <p hidden="hidden">
                I am hidden</p>
        </div>
    </body>
</html>
All the attributes included in HTML are included in the default import.
onclick, id, `class`, href, etc.; the
Scaladoc
lists out what is available.
Inline Styles & Classes
html(
  head(
    script("some script")
  ),
  body(
    h1(backgroundColor:="blue", color:="red")("This is my title"),
    div(backgroundColor:="blue", color:="red")(
      p(cls := "contentpara first")(
        "This is my first paragraph"
      ),
      a(opacity:=0.9)(
        p(cls := "contentpara")("Goooogle")
      )
    )
  )
)
In HTML, style attributes are often thought of not as normal attributes (which contain strings), but as lists of key-value pairs. Furthermore, there is a large but finite number of styles, and a style cannot simply be any arbitrary string. The above example shows how CSS classes and inline-styles are typically set.
Note that in this case, backgroundColor, color and opacity are all statically typed identifiers. These are all instances of Style and are defined by Scalatags.
Of course, style is in the end just an attribute, so you can treat it as such and bind them directly without any fuss:
html(
  head(
    script("some script")
  ),
  body(
    h1(style:="background-color: blue; color: red;")("This is my title"),
    div(style:="background-color: blue; color: red;")(
      p(`class`:="contentpara first")(
        "This is my first paragraph"
      ),
      a(style:="opacity: 0.9;")(
        p(cls := "contentpara")("Goooogle")
      )
    )
  )
)
Both the above examples print the same thing:
<html>
    <head>
        <script>some script</script>
    </head>
    <body>
        <h1 style="background-color: blue; color: red;">This is my title</h1>
        <div style="background-color: blue; color: red;">
        <p class="contentpara first">This is my first paragraph</p>
        <a style="opacity: 0.9;">
            <p class="contentpara">Goooogle</p>
        </a>
        </div>
    </body>
</html>
A list of the attributes and styles provided by ScalaTags can be found in Attrs and Styles. This of course won't include any which you define yourself.
Custom Attributes, Styles, Tag Names
The common HTML attributes all have static values to use in your
fragments. This keeps things concise and statically checked. However,
inevitably you'll want to set some attribute which isn't in the
initial list defined by scalatags.Text. This can be done with the
attr(s: String) functions that Scalatags provides. If you want
to create an empty attribute, you can use attr(...).empty:
html(
  head(
    script("some script")
  ),
  body(
    h1("This is my title"),
    div(
      p(attr("onclick"):="... do some js")(
        "This is my first paragraph"
      ),
      a(attr("href"):="www.google.com")(
        p("Goooogle")
      ),
      p(attr("hidden").empty)(
        "I am hidden"
      )
    )
  )
)
<html>
<head>
<script>some script</script>
</head>
<body>
<h1>This is my title</h1>
<div>
<p onclick="... do some js">
This is my first paragraph</p>
<a href="www.google.com">
<p>Goooogle</p>
</a>
<p hidden="hidden">
I am hidden</p>
</div>
</body>
</html>
You can also use css(...) to create a custom inline style, if for some reason the style you want isn't available in the default set:
div(
  attr("data-app-key") := "YOUR_APP_KEY",
  css("background-color") := "red"
)
If you wish to, you can also take the result of the attr call and assign it to a variable for you to use later in an identical way.
{
  val dataAppKey = attr("data-app-key")
  val customBackgroundColorStyle = css("background-color")
  div(
    dataAppKey := "YOUR_APP_KEY",
    customBackgroundColorStyle := "red"
  )
}
Both the above examples print the same thing:
<div data-app-key="YOUR_APP_KEY" style="background-color: red;"></div>
You can also create custom tags, using the tag(...) function. For example, if we take the earlier snippet:
html(
  head(
    script("some script")
  ),
  body(
    h1("This is my title"),
    p("Hello")
  )
)
And imagine that all these are special XML/HTML tags that aren't included by default, you can still construct them yourself:
tag("html")(
  tag("head")(
    tag("script")("some script")
  ),
  tag("body")(
    tag("h1")("This is my title"),
    tag("p")("Hello")
  )
)
Both these examples print:
<html>
    <head>
        <script>some script</script>
    </head>
    <body>
        <h1>This is my title</h1>
        <p>Hello</p>
    </body>
</html>
Like custom attributes and styles, custom tag names can be assigned to a val and re-used, or they can just be used in-line.
As a larger example snippet, here is the code snippet that generates the RSS feed for Haoyi's Programming Blog:
val rssXml = {
  val snippet = tag("rss")(attr("version") := "2.0")(
    tag("channel")(
      tag("title")("Haoyi's Programming Blog"),
      tag("link")("http://www.lihaoyi.com/"),
      tag("description"),

      for((name, rawHtmlContent, rawHtmlSnippet, updates) <- posts) yield tag("item")(
        tag("title")(name),
        tag("link")(s"http://www.lihaoyi.com/post/${sanitize(name)}.html"),
        tag("description")(rawHtmlSnippet),
        for ((sha, date) <- updates.lastOption)
        yield tag("pubDate")(formatRssDate(date)),
        for ((sha, date) <- updates.headOption)
        yield tag("lastBuildDate")(formatRssDate(date))
      )

    )
  )
  """<?xml version="1.0"?>""" + snippet.render
}
Since Scalatags is meant to generate HTML, it does not include the RSS tags in the default import. Nevertheless, you can use custom tags and attributes to build whatever XML structure you desire, regardless of whether Scalatags has those specific tags/attributes built in or not.
Non-String Attributes and Styles
div(
  p(float.left)(
    "This is my first paragraph"
  ),

  a(tabindex:=10)(
    p("Goooogle")
  ),
  input(disabled:=true)
)
Not all attributes and styles take strings; some, like float, have an enumeration of valid values, and can be referenced by float.left, float.right, etc.. Others, like tabindex or disabled, take Ints and Booleans respectively. These are used directly as shown in the example above.
Even for styles or attributes which take values other than strings (e.g. float), the := operator can still be used to force assignment:
The above example prints:
<div>
    <p style="float: left;">This is my first paragraph</p>
    <a tabindex="10">
        <p>Goooogle</p>
    </a>
    <input disabled="true" />
</div>
Passing in numbers to the styles which require a px at the end results in the px being appended automatically:
div(width:=100, zIndex:=100, padding:=100)<div style="width: 100px; z-index: 100; padding: 100px;"></div>
Note how this doesn't affect other styles (e.g. z-index) which don't need this suffix. Generally, just pass in whatever you want and it'll do the right thing.
Boolean attributes such as readonly can be passed in alone:
div(input(readonly))<div><input readonly="readonly" /></div>
And will default to a value with the same name as the attribute. You can still set the value manually with := if you wish
div(input(readonly:=1))<div><input readonly="1" /></div>Variables
{
  val title = "title"
  val numVisitors = 1023

  html(
    head(
      script("some script")
    ),
    body(
      h1("This is my ", title),
      div(
        p("This is my first paragraph"),
        p("you are the ", numVisitors.toString, "th visitor!")
      )
    )
  )
}
Variables can be inserted into the templates as Strings, simply by adding them to an element's children. This prints:
<html>
    <head>
        <script>some script</script>
    </head>
    <body>
        <h1>This is my title</h1>
        <div>
            <p>This is my first paragraph</p>
            <p>you are the 1023th visitor!</p>
        </div>
    </body>
</html>
Control Flow
{
  val numVisitors = 1023
  val posts = Seq(
    ("alice", "i like pie"),
    ("bob", "pie is evil i hate you"),
    ("charlie", "i like pie and pie is evil, i hat myself")
  )

  html(
    head(
      script("some script")
    ),
    body(
      h1("This is my title"),
      div("posts"),
      for ((name, text) <- posts) yield div(
        h2("Post by ", name),
        p(text)
      ),
      if(numVisitors > 100) p("No more posts!")
      else p("Please post below...")
    )
  )
}
Like most other XML templating languages, ScalaTags contains control flow statements like if and for. Unlike other templating languages which have their own crufty little programming language embedded inside them for control flow, you probably already know how to use ScalaTags' control flow syntax. It's just Scala after all.
This prints out:
<html>
    <head>
        <script>some script</script>
    </head>
    <body>
        <h1>This is my title</h1>
        <div>posts</div>
        <div>
            <h2>Post by alice</h2>
            <p>i like pie</p>
        </div>
        <div>
            <h2>Post by bob</h2>
            <p>pie is evil i hate you</p>
        </div>
        <div>
            <h2>Post by charlie</h2>
            <p>i like pie and pie is evil, i hat myself</p>
        </div>
        <p>No more posts!</p>
    </body>
</html>
Functions
{
  def imgBox(source: String, text: String) = div(
    img(src:=source),
    div(
      p(text)
    )
  )

  html(
    head(
      script("some script")
    ),
    body(
      h1("This is my title"),
      imgBox("www.mysite.com/imageOne.png", "This is the first image displayed on the site"),
      div(`class`:="content")(
        p("blah blah blah i am text"),
        imgBox("www.mysite.com/imageTwo.png", "This image is very interesting")
      )
    )
  )
}
Many other templating systems define incredibly roundabout ways of creating re-usable parts of the template. In ScalaTags, we don't need to re-invent the wheel, because Scala has these amazing things called *functions*.
The above example prints:
<html>
    <head>
        <script>some script</script>
    </head>
    <body>
        <h1>This is my title</h1>
        <div>
            <img src="www.mysite.com/imageOne.png" />
            <div>
                <p>This is the first image displayed on the site</p>
            </div>
        </div>
        <div class="content">
            <p>blah blah blah i am text</p>
            <div>
                <img src="www.mysite.com/imageTwo.png" />
            <div>
                <p>This image is very interesting</p>
            </div>
            </div>
        </div>
    </body>
</html>
Auto-escaping and unsanitized Input
val evilInput1 = "\"><script>alert('hello!')</script>"
val evilInput2 = "<script>alert('hello!')</script>"

html(
  head(
    script("some script")
  ),
  body(
    h1(
      title:=evilInput1,
      "This is my title"
    ),
    evilInput2
  )
)
By default, any text that's put into the Scalatags templates, whether as a attribute value or a text node, is properly escaped when it is rendered. Thus, when you run the following snippet, you get this:
<html>
<head>
<script>some script</script>
</head>
<body>
<h1 title=""><script>alert('hello!')</script>">
This is my title
</h1>
<script>alert('hello!')</script>
</body>
</html>
As you can see, the contents of the variables evilInput1 and evilInput2 have been HTML-escaped, so you do not have to worry about un-escaped user input messing up your DOM or causing XSS injections. Furthermore, the names of the tags (e.g. "html") and attributes (e.g. "href") are themselves validated: passing in an invalid name to either of those (e.g. a tag or attribute name with a space inside) will throw an IllegalArgumentException).
If you really want, for whatever reason, to put unsanitized input into your HTML, simply surround the string with a raw tag:
val evilInput = "<script>alert('hello!')</script>"

html(
  head(
    script("some script")
  ),
  body(
    h1("This is my title"),
    raw(evilInput)
  )
)
prints
<html>
    <head>
        <script>some script</script>
    </head>
    <body>
        <h1>This is my title</h1>
        <script>alert('hello!')</script>
    </body>
</html>
As you can see, the <script> tags in evilInput have been passed through to the resultant HTML string unchanged. Although this makes it easy to open up XSS holes (as shown above!), if you know what you're doing, go ahead.
There isn't any way to put unescaped text inside tag names, attribute names, or attribute values.
Layouts
{
  def page(scripts: Seq[Modifier], content: Seq[Modifier]) =
    html(
      head(scripts),
      body(
        h1("This is my title"),
        div(cls := "content")(content)
      )
    )

  page(
    Seq(
      script("some script")
    ),
    Seq(
      p("This is the first ", b("image"), " displayed on the ", a("site")),
      img(src:="www.myImage.com/image.jpg"),
      p("blah blah blah i am text")
    )
  )
}
Again, this is something that many other templating languages have their own special implementations of. In ScalaTags, this can be done simply by just using functions! The above snippet gives you:
<html>
    <head>
        <script>some script</script>
    </head>
    <body>
        <h1>This is my title</h1>
            <div class="content">
            <p>This is the first <b>image</b> displayed on the <a>site</a></p>
                <img src="www.myImage.com/image.jpg" />
            <p>blah blah blah i am text</p>
        </div>
    </body>
</html>
Inheritance
{
  class Parent{
    def render = html(
      headFrag,
      bodyFrag

    )
    def headFrag = head(
      script("some script")
    )
    def bodyFrag = body(
      h1("This is my title"),
      div(
        p("This is my first paragraph"),
        p("This is my second paragraph")
      )
    )
  }

  object Child extends Parent{
    override def headFrag = head(
      script("some other script")
    )
  }


  Child.render
}
Most of the time, functions are sufficient to keep things DRY, but if for some reason you want to use inheritance to structure your code, you probably already know how to do so. Again, unlike other frameworks that have implemented complex inheritance systems themselves, Scalatags is just Scala, and it behaves as you'd expect.
<html>
    <head>
        <script>some other script</script>
    </head>
    <body>
        <h1>This is my title</h1>
        <div>
            <p>This is my first paragraph</p>
            <p>This is my second paragraph</p>
        </div>
    </body>
</html>
Data and Aria
Data attributes work by separating the sections of the attribute with . instead of -:
div(
  id:="electriccars",
  data.columns:="3",
  data.index.number:="12314",
  data.parent:="cars",
  "..."
)
<div
id="electriccars"
data-columns="3"
data-index-number="12314"
data-parent="cars">
...
</div>Aria attributes work too:
div(
  div(id:="ch1Panel", role:="tabpanel", aria.labelledby:="ch1Tab")(
    "Chapter 1 content goes here"
  ),
  div(id:="ch2Panel", role:="tabpanel", aria.labelledby:="ch2Tab")(
    "Chapter 2 content goes here"
  ),
  div(id:="quizPanel", role:="tabpanel", aria.labelledby:="quizTab")(
    "Quiz content goes here"
  )
)
<div>
<div id="ch1Panel" role="tabpanel" aria-labelledby="ch1Tab">
Chapter 1 content goes here
</div>
<div id="ch2Panel" role="tabpanel" aria-labelledby="ch2Tab">
Chapter 2 content goes here
</div>
<div id="quizPanel" role="tabpanel" aria-labelledby="quizTab">
Quiz content goes here
</div>
</div>Grouping Frags and Modifiers
Renderable fragments are of the type Frag; these may
represent a single HTML tag, multiple HTML tags, or even a mix of HTML
tags and strings. For example, the h1 and p in the below
snippet can be thought of as a single Frag:
{
  div(
    h1("Hello"),
    p("World")
  )
}
These can be
grouped together as a Seq[Frag](...) and used together:
{
  val children = Seq[Frag](
    h1("Hello"),
    p("World")
  )
  div(
    children
  )
}
Or via the helper method frag(...), that aggregates it into a
single Frag:
{
  val children: Frag = frag(
    h1("Hello"),
    p("World")
  )
  div(
    children
  )
}
All of these render to the same output:
<div>
    <h1>Hello</h1>
    <p>World</p>
</div>
Similarly, Modifiers such as Attributes or
Inline Styles & Classes can also be grouped together as
aggregate Modifiers. Taking the modifiers from this snippet:
{
  div(
    cls := "my-bootstrap-class",
    color := "red"
  )
}
We can group them together in a Seq[Modifier] and apply them together:
{
  val mods = Seq[Modifier](
    cls := "my-bootstrap-class",
    color := "red"
  )
  div(
    mods
  )
}
Or we can aggregate them into a single Modifier using
modifier(...)
{
  val mods: Modifier = modifier(
    cls := "my-bootstrap-class",
    color := "red"
  )
  div(
    mods
  )
}
All of these generate the same output:
<div class="my-bootstrap-class" style="color: red;"></div>
Any "arbitrary HTML blob" that isn't guaranteed to have
a single root tag is basically a Frag, which is a pretty common
thing to take as an argument or return as the result of a function, and
frag makes it convenient to deal with these.
In general, aggregating things together using frag is useful if
you want to pass around HTML snippets without necessarily wrapping them
in a HTML tag.
Similarly, the Modifier type lets you represent any ad-hoc
collection of zero-or-more attributes, styles or children that you can
apply to a HTML tag. This is a common requirement: For example, when
defining Functions that represent complex, re-usable
components, you often want to let the caller pass in arbitrary sets of
styles or attributes to apply to various parts of that component. This
is easily done by making the function take in various Modifier
arguments that are then applied to the relevant tags, and the
modifiers(...) function helps you easily deal with such groups
of Modifiers.
More details about Modifiers and Frags can be seen in
the documentation of Scalatags' Internals
Managing Imports
// bundle is scalatags.Text or scalatags.JsDom
import bundle.short._
div(
  p(*.color:="red", *.fontSize:=64.pt)("Big Red Text"),
  img(*.href:="www.imgur.com/picture.jpg")
)
Apart from using import scalatags.Text.all._, it is possible to perform the imports manually, renaming whatever you feel like renaming. The example above provides an example which imports all HTML tags, but imports Attrs and Styles aliased rather than dumping their contents into your global namespace. This helps avoid polluting your namespace with lots of common names (e.g. value, id, etc.) that you may not use.
The main objects which you can import things from are:
-
tags: common HTML tags -
tags2: less common HTML tags -
attrs: common HTML attributes -
styles: common CSS styles -
styles2: less common CSS styles -
svgTags: SVG tags -
svgAttrs: attributes only associated with SVG elements -
DataConverters: convenient extensions (e.g.10.px) to create the CSS datatypes
You can pick and choose exactly which bits you want to import, or you can use one of the provided aggregates:
-
all: this imports the contents ofTags,Attrs,StylesandDataConverters -
short: this imports the contents ofTagsandDataConverters, but aliasesAttrsandStylesas*
Thus, you can choose exactly what you want to import, and how:
{
  // bundle is scalatags.Text or scalatags.JsDom
  import bundle.{attrs => attr, styles => css, _}
  import bundle.tags._
  import bundle.implicits._
  div(
    p(css.color:="red", css.fontSize:=64.pt)("Big Red Text"),
    img(attr.href:="www.imgur.com/picture.jpg")
  )
}
Or you can rely on a aggregator like all, which the rest of the examples use, or short. short imports Attrs and Styles as *, making them quick to access without cluttering the global namespace:
// bundle is scalatags.Text or scalatags.JsDom
import bundle.short._
div(
  p(*.color:="red", *.fontSize:=64.pt)("Big Red Text"),
  img(*.href:="www.imgur.com/picture.jpg")
)
Both these examples print:
<div>
    <p style="color: red;">Red Text</p>
    <img href="www.imgur.com/picture.jpg" />
</div>
This custom import object also provides you a place to define your own custom tags that will be imported throughout your project e.g. a js(s: String) tag as shorthand for script(src:=s). You can even override the default definitions, e.g. making script be a shorthand for script(type:="javascript") so that you can never forget to use your own custom version.
The lesser used tags or styles are generally not imported wholesale by default, but you can always import the ones you need:
// bundle is scalatags.Text or scalatags.JsDom
import bundle._
import styles2.pageBreakBefore
import tags2.address
import svgTags.svg
import svgAttrs.stroke
div(
  p(pageBreakBefore.always, "a long paragraph which should not be broken"),
  address("500 Memorial Drive, Cambridge MA"),
  svg(stroke:="#0000ff")
)
This prints:
<div>
    <p style="page-break-before: always;">
        a long paragraph which should not be broken
    </p>
    <address>500 Memorial Drive, Cambridge MA</address>
    <svg stroke="#0000ff"></svg>
</div>
Custom Bundles
object CustomBundle extends Text.Cap with text.Tags with text.Tags2 with Text.Aggregate{
  object st extends Text.Cap with Text.Styles with Text.Styles2
  object at extends Text.Cap with Text.Attrs
}

import CustomBundle._

html(
  head(
    script("some script")
  ),
  body(
    h1(st.backgroundColor:="blue", st.color:="red")("This is my title"),
    div(st.backgroundColor:="blue", st.color:="red")(
      p(at.cls := "contentpara first")(
        "This is my first paragraph"
      ),
      a(st.opacity:=0.9)(
        p(at.cls := "contentpara")("Goooogle")
      )
    )
  )
)
In addition to importing things piecemeal from various pre-defined namespaces, Scalatags allows you to build a custom bundle which can be used to provide a single-import syntax for whatever import convention you're using. For example, the above snippet sets up a custom bundle which dumps Tags and Tags2 in the local namespace, assigns Styles and Styles2 to the st object, Attrs to the at object, and ignores Svg-related styles and tags entirely. This lets you enforce a particular convention without having to duplicate the same import-renamings in multiple files in your application.
The above snippet prints the following:
<html>
    <head>
        <script>some script</script>
    </head>
    <body>
        <h1 style="background-color: blue; color: red;">This is my title</h1>
        <div style="background-color: blue; color: red;">
        <p class="contentpara first">This is my first paragraph</p>
        <a style="opacity: 0.9;">
            <p class="contentpara">Goooogle</p>
        </a>
        </div>
    </body>
</html>
Despite its usefulness in enforcing a particular import convention, custom bundles are completely interoperable with each other or with the default all and short bundles, and the above snippet could equally be written as:
import CustomBundle.{st, at}
import Text.all._

CustomBundle.html(
  head(
    script("some script")
  ),
  CustomBundle.body(
    h1(backgroundColor:="blue", st.color:="red")("This is my title"),
    div(st.backgroundColor:="blue", color:="red")(
      p(cls := "contentpara first")(
        "This is my first paragraph"
      ),
      CustomBundle.a(st.opacity:=0.9)(
        p(at.cls := "contentpara")("Goooogle")
      )
    )
  )
)
Mixing both things from the all bundle as well as st and at from our own CustomBundle. That's not to say you should do this, but if for some reason if e.g. you're using different conventions for different source files, you can be sure that they'll work together just fine.
Although Scalatags was originally a HTML-String generation library, it now ships with an additional backend that runs only on ScalaJS, available by replacing
import scalatags.Text._
with
import scalatags.JsDom._
This gives you a version of Scalatags that renders directly to dom.Elements, rather than spitting out strings. With the DOM backend, toString still works and generates a HTML string, but is implemented by constructing a tree of dom.Elements and calling .outerHTML on them, and the resultant string may have subtle differences (e.g. order of attributes, or whitespace between styles) from the Text backend.
Using the DOM
The DOM backend provides an additional method .render on all Scalatags fragments, which converts the fragment into a DOM tree:
val elem = div.render
assert(elem.children.length == 0)
elem.appendChild(p(1, "wtf", "bbq").render)
assert(elem.children.length == 1)
val pElem = elem.children(0).asInstanceOf[Paragraph]
assert(pElem.childNodes.length == 3)
assert(pElem.textContent == "1wtfbbq")
As you can see, you can manipulate DOM elements directly, calling standard DOM APIs like .children, .appendChild, etc.
In addition to the default ability to splice Strings, Booleans and Ints into the Scalatags fragment, the DOM backend allows you to bind arbitrary js.Any-convertible objects, e.g. the function literal shown below:
var count = 0
val elem = div(
  onclick := { () => count += 1},
  tabindex := 1
).render

assert(count == 0)
elem.onclick(null)
assert(count == 1)
As you can see, the function literal is kept intact rather than being serialized (as you would expect in the Text backend). When called via the attribute of the element, you can see that it functions intact and properly increments the counter.
Use Cases
Having direct access to the DOM allows a great deal of flexibility that you do not have when working with strings. For example, the example below defines an input-label pair which clears the label when you focus on the input, a common pattern:
val labelElem = label("Default").render

val inputElem = input(
  `type`:="text",
  onfocus := { () => labelElem.textContent = ""}
).render

val box = div(
  inputElem,
  labelElem
).render

assert(labelElem.textContent == "Default")
inputElem.onfocus(null)
assert(labelElem.textContent == "")
This allows a very convenient direct-binding of behaviors without having to trawl through the DOM with jquery selectors or creating lots of IDs and worrying about collisions.
The DOM backend currently requires you to separately add a dependency on scala-js-dom for it to function.
If you wish to, it is possible to write code that is generic against the Scalatags backend used, and can be compiled and run on both Text and JsDom backends at the same time! This is done by adding an explicit dependency on generic.Bundle[Builder, Output, FragT], e.g. how it is done in the unit tests:
class ExampleTests[Builder, Output, FragT](bundle: Bundle[Builder, Output, FragT]) extends TestSuite{
  import bundle._
  ...
}
Inside this scope, you are limited to only using the common functionality defined in generic.Bundle, and can't use any Text or JsDom specific APIs. However, in exchange you can write code that works in either backend, by instantiating it with the respective bundle:
object ExampleTests extends generic.ExampleTests(scalatags.Text)
object ExampleTests extends generic.ExampleTests(scalatags.JsDom)
For example, here is an example defining a simple HTML widget in a
cross-platform way, which can then be used to render both
Strings on both Scala.js and Scala-JVM, or dom.Elements
on Scala.js:
class SharedTemplates[Builder, Output <: FragT, FragT](val bundle: scalatags.generic.Bundle[Builder, Output, FragT]){
  import bundle.all._
  val widget: Tag = div("hello")
}

object JsTemplates extends SharedTemplates(scalatags.JsDom)
object TextTemplates extends SharedTemplates(scalatags.Text)

val jsVersion: dom.Element = JsTemplates.widget.render
val txtVersion: String = TextTemplates.widget.render

assert(
  jsVersion.tagName.toLowerCase == "div",
  jsVersion.textContent == "hello",
  txtVersion == "<div>hello</div>"
)
There's a small amount of boilerplate in setting up the generic
SharedTemplates class to take a generic bundle, but once
done you can define as many templates inside it as you wish. You can then
instantiate SharedTemplates twice, once for scalatags.Text
and once for scalatags.JsDom, and can freely use any of the
templates on either backend implementation.
In general, when writing cross-backend code against an abstract
bundle, you are limited to the APIs that are common between
both Text and JsDom backends. That means e.g. you cannot
pass in callbacks to onclick functions, as that is only possible
in JsDom and not in Text. Stepping outside the bounds of
the common API is a compile error.
This is currently used to shared the bulk of unit tests between the Text and JsDom backends, and could be useful in other scenarios where you may want to swap between them (e.g. using Text on the server, and JsDom on the client where it's available) while sharing as much code as possible.
For a concrete, self-contained example of this, look at the demo page.
Here are a few live examples, all generated from the same source code at
https://github.com/lihaoyi/scalatags/blob/master/example/src/main/scala/example/ScalaJSExample.scala
Using Scalatag's Cross-Backend Codecross-building support. Thus the same code is used to generate both the Text and JsDom examples that you see below. If done correctly, both examples should appear identical
scalatags.Text HTML
scalatags.Text SVG
scalatags.JsDom HTML
scalatags.JsDom SVG
Scalatags offsers an internal DSL for constructing CSS Stylesheets. The basic construction looks like:
import scalatags.stylesheet._
object Simple extends StyleSheet {
  initStyleSheet()

  val x = cls(
    backgroundColor := "red",
    height := 125
  )
  val y = cls.hover(
    opacity := 0.5
  )

  val z = cls(x.splice, y.splice)
}
This generates a stylesheet that looks like
.$pkg-Simple-x{
  background-color: red;
  height: 125px;
}
.$pkg-Simple-y:hover{
  opacity: 0.5;
}
.$pkg-Simple-z{
  background-color: red;
  height: 125px;
  opacity: 0.5;
}
You can then access Simple.styleSheetText in order to do things with the generated stylesheet text. Exactly what you want to do is up to you: In Scala-JVM you will likely want to save it to a file (to be served later) or inlined into some HTML fragment, while in Scala.js you may insert it into the page directly via a style tag.
Only clss defined on trait Simple are gathered up as part of the generated stylesheet. By default, the name of each class is constructed via the names $pkg-$class-$def. You can override customSheetName to replace the pkg-$class part with something else.
Once the stylesheet is defined, you can then immediately start using styles within your Scalatags fragments, just like any other Modifier:
val x = div(
  Simple.x,
  Simple.y
)
<div class=" $pkg-Simple-x $pkg-Simple-y"></div>
By default, Scalatag's StyleSheets have no cascading: you only can define styles for a single class (and it's pseudo-selectors) at a single time. If you want to define styles for multiple tags without a larger HTML fragment, you should define multiple classes. The fact that Scalatag's cls definitions are just normal defs makes managing these classes very easy: you can use standard IDE's or tools to jump-to-definitions, auto-rename them, etc.. Many common mistakes in CSS, such as accidentally mis-spelling a class-name or botching a renaming, become compilation errors.
Since Scalatags StyleSheets are just Scala, you can feel free to use normal Scala techniques (constants, functions, traits, etc.) to DRY up your code without having to learn any special Scalatags-specific mechanisms.
Inline Modifiers
The above example contains a single hover pseudo-selector, but what if you want the same class to have a whole range of pseudo-selectors? To do that, simply nest the selectors inline inside the cls fragment:
object Inline extends StyleSheet{
  initStyleSheet()

  val w = cls(
    &.hover(
      backgroundColor := "red"
    ),
    &.active(
      backgroundColor := "blue"
    ),
    &.hover.active(
      backgroundColor := "yellow"
    ),
    opacity := 0.5
  )
}
This generates the stylesheet:
.$pkg-Inline-w{
  opacity: 0.5;
}
.$pkg-Inline-w:hover{
  background-color: red;
}
.$pkg-Inline-w:active{
  background-color: blue;
}
.$pkg-Inline-w:hover:active{
  background-color: yellow;
}
Cascading
Occassionally, you really do want your CSS stylesheets to cascade. This may be e.g. because you want to define styles for a large HTML document, and don't want to repeat the "default" classes throughout your HTML. In order to do this with Scalatags, you have to opt in by inheriting from CascadingStyleSheet:
object Cascade extends CascadingStyleSheet{
  initStyleSheet()

  val y = cls()
  val x = cls(
    a(
      backgroundColor := "red",
      textDecoration.none
    ),
    a.hover(
      backgroundColor := "blue",
      textDecoration.underline
    ),
    (a.hover ~ div ~ y)(
      opacity := 0
    ),
    div.hover(
      div(
        y(
          opacity := 0
        )
      )
    )
  )
}
This generates:
.$pkg-Cascade-x a{
  background-color: red;
  text-decoration: none;
}
.$pkg-Cascade-x a:hover{
  background-color: blue;
  text-decoration: underline;
}
.$pkg-Cascade-x a:hover div .$pkg-Cascade-y{
  opacity: 0;
}
.$pkg-Cascade-x div:hover div .$pkg-Cascade-y{
  opacity: 0;
}
With Scalatags, even cascadin styles must start with a "root" class. However,inside that class, you then have two ways of defining cascades:
-
Via nesting: you can nest Scalatags HTML tags such as
aordiv, or other pre-defined classes such asCascade.y -
Via the
~or>operators, for defining a chain with or without the>child-selector
You shouldn't need cascading often, but when you do, it's useful to have around. Scalatags gives you the best of both worlds by exposing it where necessary but preventing you from using it by accident.
Scalatags' CSS support is minimal and opinionated, and intentionally much less featureful than Scala-CSS. While the feature set will probably grow slightly to accommodate people's needs, it will always be a comparatively small, spartan API.
| Template Engine | Renders |
|---|---|
| Scalatags | 7436041 |
| scala-xml | 3794707 |
| Twirl | 1902274 |
| Scalate-Mustache | 500975 |
| Scalate-Jade | 396224 |
These numbers are the number of times each template engine is able to render (to a String) a simple, dynamic HTML fragment in 60 seconds.
The fragment (shown below) is designed to exercise a bunch of different functionality in each template engine: functions/partials, loops, value-interpolation, etc.. The templates were structured identically despite the different languages used by the various engines. All templates were loaded and rendered once before the benchmarking begun, to allow for any file-operations/pre-compilation to happen.
The numbers speak for themselves; Scalatags is almost twice as fast as splicing/serializing scala-xml literals, almost four times as fast as Twirl, and 10-15 times as fast as the various Scalate alternatives. This is likely due to overhead from the somewhat bloated data structures used by scala-xml, which Twirl also uses, and the heavy-use of dictionaries used to implement the custom scoping in the Scalate templates. Although this is a microbenchmark, and probably does not perfectly match real-world usage patterns, the conclusion is pretty clear: Scalatags is fast!
This is the Scalatags fragment that was rendered:
html( head( script("console.log(1)") ), body( h1(color := "red")(titleString), div(backgroundColor := "blue")( para(0, cls := contentpara + " " + first, firstParaString ), a(href := "www.google.com")( p("Goooogle") ), for (i <- 0 until 5) yield { para(i, cls := contentpara, color := (if (i % 2 == 0) "red" else "green"), "Paragraph ", i ) } ) ) ).toString<html> <head> <script>console.log(1)</script> </head> <body> <h1 style="color: red;">This is my title</h1> <div style="background-color: blue;"> <p class="contentpara first" title="this is paragraph 0">This is my first paragraph</p> <a href="www.google.com"> <p>Goooogle</p> </a> <p class="contentpara" style="color: red;" title="this is paragraph 0">Paragraph 0</p> <p class="contentpara" style="color: green;" title="this is paragraph 1">Paragraph 1</p> <p class="contentpara" style="color: red;" title="this is paragraph 2">Paragraph 2</p> <p class="contentpara" style="color: green;" title="this is paragraph 3">Paragraph 3</p> <p class="contentpara" style="color: red;" title="this is paragraph 4">Paragraph 4</p> </div> </body> </html>The rest of the code involved in this micro-benchmark can be found in PerfTests.scala
The primary data structure Scalatags uses are the TypedTag,
representing some kind of HTML/XML tag:
trait TypedTag[Builder, +Output, FragT] extends Frag[Builder, FragT]{
  def tag: String

  /**
   * The modifiers that are applied to a TypedTag are kept in this linked-Seq
   * (which are actually WrappedArrays) data-structure in order for maximum
   * performance.
   */
  def modifiers: List[Seq[Modifier[Builder]]]

  /**
   * Add the given modifications (e.g. additional children, or new attributes)
   * to the [[TypedTag]].
   */
  def apply(xs: Modifier[Builder]*): Self

  /**
   * Collapses this scalatags tag tree and returns an [[Output]]
   */
  def render: Output
}
The Frag, representing a renderable snippet, containing zero
or more HTML/XML tags and string nodes:
trait Frag[Builder, FragT] extends Modifier[Builder]{
  def render: FragT
}
And the Modifier, representing anything that can be applied
to a Tag: styles, classes, attributes, as well as any sort of
Frag which can be appended to it's children:
trait Modifier[Builder] {
  /**
   * Applies this modifier to the specified [[Builder]], such that when
   * rendering is complete the effect of adding this modifier can be seen.
   */
  def applyTo(t: Builder): Unit
}
A TypedTag is basically a tag-name together with a loose bag of Modifiers, and is itself a Modifier so it can be nested within other TypedTags. A Modifier is a tag, a sequence of tags, an attribute binding, a style binding, or anything else that can be used to modify how a tag will be rendered. Lastly, a Frag represents the smallest standalone atom, which includes tags, loose strings, numbers, and other things.
In the text backend you have the alias
type Tag = TypedTag[String]Since everything renders to a string. In the DOM backend you have:
type HtmlTag = JsDom.TypedTag[dom.HTMLElement]
type SvgTag = JsDom.TypedTag[dom.SVGElement]
type Tag = JsDom.TypedTag[dom.Element]
These aliases help you keep your code short by letting you refer to the most common versions of TypedTag via concise names.
Each Scalatags backend has its own refinements, e.g. Text.TypedTag, Text.Frag and Text.Modifier have the Builder type-parameter fixed as text.Builder, and the Output type-parameter fixed as String. Their JsDom.* counterparts have Builder fixed as dom.Element, and Output fixed to various subclasses of dom.Element. The various other classes/traits (e.g. Attr, AttrPair, StylePair, etc.) are similarly abstract with concrete versions in each backend.
The current selection of Modifiers (or implicitly convertable) types include:
-
TypedTags andStrings: appends itself to the parent'schildrenlist. -
StylePairs: appends the inlinestyle: value;to the parent'sstyleattribute. -
StringFrags: append the string as a child. -
RawFrags: append the string to the parent as unescaped HTML.
AttrPairs: sets a key in the parent's attrs list.
The bulk of Scalatag's ~5000 lines of code is static bindings (and inline documentation!) for the myriad of CSS rules and HTML tags and attributes that exist. The core of Scalatags lives in Core.scala, with most of the implicit extensions and conversions living in package.scala.
Architecture
Scalatags has pretty odd internals in order to support code re-use between the Text and Dom packages. Essentially, each Scalatags package is an instance of
trait Bundle[Builder, Output <: FragT, FragT]{
Which is parametrized on the Builder used to generate the output, the type generated by rendering a Frag, as well as the final Output type generated by rendering a TypedTag. The Text package is defined as
object Text extends Bundle[text.Builder, String, String] {
Since it uses a custom text.Builder object for maximum performance and spits out a String, while the Dom package is defined as as
object JsDom extends generic.Bundle[dom.Element, dom.Element, dom.Node]
Since it uses dom.Elements both as the intermediate builder as well as the final result.
This layout allows Scalatags to specify formally which types are common between the two backends (i.e. those in generic.Bundle) and which can vary. For example, both backends have a concept of TypedTags, Frags and Modifiers. On the other hand, The Text backend has TypedTag[String] aliased as Tag since it will always be String, while the Dom backend has it left as
TypedTag[+Output <: dom.Element]
With helper types bound as:
type HtmlTag = TypedTag[dom.HTMLElement]
type SvgTag = TypedTag[dom.SVGElement]
type Tag = TypedTag[dom.Element]
Since it is likely that working with the Dom backend you will want to distinguish these.
Extensibility
A mix of typeclasses and implicit conversions is used to control what you can put into a Scalatags fragment. For example, the typeclasses
trait AttrValue[Builder, T]{
  def apply(t: Builder, a: Attr, v: T)
}
trait StyleValue[Builder, T]{
  def apply(t: Builder, s: Style, v: T)
}
Allow you to specify what (and how) types can be used as attributes and styles respectively, while implicit conversions to Modifier or Frag are used to allow you to use arbitrary types as children. The use of implicit conversions in this case is to allow it to work with variable length argument lists (i.e. (mods: *Modifier)), which is difficult to do with typeclasses.
Due to this design, and the parametrization of the bundles described earlier, it is possible to define behavior for a particular type only where it makes sense. e.g. there is a pair of typeclass instances
implicit object bindJsAny extends generic.AttrValue[dom.Element, js.Any]
implicit def bindJsAnyLike[T <% js.Any] = new generic.AttrValue[dom.Element, T]
Which allows you to bind anything convertible to a js.Any into the JsDom fragments, since they can just be assigned directly to the attributes of the dom.Element objects. Doing the same thing for Text fragments doesn't make sense, and would correctly fail to compile.
You can easier add other typeclass instances to handle binding e.g. Futures (which will add a child or set an attr/style on completion), or reactive variables (which would constantly update the child/attr/style every time it changes).
Scalatags was made after experience with a broad range of HTML generation systems. This experience (with both the pros and cons of existing systems) informed the design of scalatags.Text.
Old-school Templates
Jinja2 is the templating engine that comes bundled with Flask, a similar (but somewhat weaker) system comes bundled with Django, and another system in a similar vein is Ruby on Rail's ERB rendering engine. This spread more-or-less represents the old-school way of rendering HTML, in that they:
- Are effectively string-based
- Use special syntax for both interpolating variables as well as for basic control flow logic
- Have a ruby/python-like (but not quite!) language for logic within the template
- Are generally with one template per file.
They also showcase many of the weaknesses of this style of templating system:
- The fact that it's string based means it's vulnerable to XSS injections, or plain-old malformed HTML output.
- The one-template-per-file rule discourages you from building your page from small re-usable fragments, because who wants to keep track of hundreds of individual files. People are reluctant to make a file with 3-5 lines in it, which is understandable but unfortunate because factoring templates into re-usable 3-5 line snippets is a good way of staying sane.
- The API is complex and novel: Jinja2 for example contains logic around file-loading & caching, as well as custom Jinja2-specific ways of doing loops, conditionals, functions, comments, inheritance, scoping, imports and other things. All these are things you would have to learn.
- The syntax is completely new; finding an editor that properly supports all the quirks and semantics (or even simply highlighting things properly) is hard. You could hack together something quick and extremely fragile, or you could wait ages for a solid plugin to materialize.
-
Abstraction is clunky: inbuilt tags are used via
<div />, while user-defined components are called e.g. by{{ component() }}. You're left with a choice between not using much abstraction and mainly sticking to inbuilt tags, or creating components and accepting the fact that your templates will basically be totally composed of{{ curly braces }}. Neither choice is satisfying. - Have no sort of static checking at all; you're just passing dicts around, and waiting for silly mistakes to blow up at run-time so you can fix them.
Razor and Play Templates
Razor, the ASP.NET MVC template engine, and the Play framework's template engine go in a new direction. Their templates generally:
- Are statically-compiled
- Re-use large chunks of the host language
Both templating systems generally use @ to delimit "code"; e.g. @for(...){...} declares a for-loop. Nice things are:
- The API is far simpler: all the custom control-flow/logic/syntax basically collapses into the simple statement "do it the way C#/Scala does it".
- Static checking in templates is nice.
However, they still have their downsides:
-
Abstractions are less clunky to use than in old-school templates, e.g.
@component()rather than{{ component() }}, but still not ideal. - The one-template-per-file rule is still there, making abstractions clunky to define.
- They still require their own special build-system-integration, run-time compilation, caching, and other things, which a templating language really shouldn't need. Scalate, which has a runtime dependency on the entire Scala compiler, suffers from the same problem.
- The syntax still poses a problem for editors; both HTML editors and C#/Scala editors won't want to work with these templates, so you still end up with sub-par support or waiting for plugins.
- You still end up with weird edge cases due to the fact that you're squashing together two completely unrelated syntaxes.
XHP and Pyxl
XHP and Pyxl are HTML generation systems used at Facebook and Dropbox. In short, they allow you to:
- Embed sections of your HTML as literals within your PHP and Python code
- Reference them as objects (e.g. calling methods and modifying fields)
- Provide a way to interpolate values and combine them.
The Pyxl homepage provides this example:
image_name = "bolton.png"
image = <img src="/static/images/{image_name}" />

text = "Michael Bolton"
block = <div>{image}{text}</div>

element_list = [image, text]
block2 = <div>{element_list}</div>
Which shows how you can generate HTML directly in your python code, using your python variables. These libraries are basically the same thing, and have some nice properties:
- The one-template-per-file rule is gone! This encourages you to make more, smaller fragments and then compose them, which is great.
- They're no longer string-based, so you won't have problems with XSS or malformed output.
- The API is really simple; maybe a dozen different things you need to remember, and the rest is "just use Python/PHP". E.g. they don't need to load templates from the filesystem any more (with all the associated discovery/loading/caching logic) since it's all just in your code.
-
The syntax is completely familiar too; apart from maybe one new rule (using
{...}to interpolate values) the rest of your templates and logic are bog-standard HTML/Python/PHP. -
Abstraction is almost seamless; both systems allow you to define custom components and have them called via
<component arg="..." />
But they're not quite there:
- Although the syntax is familiar to you, it's not familiar to your editor, and probably will mess up your syntax highlighting (and other tooling) in your Python/PHP files.
- Defining custom components (e.g. in Pyxl) is much more verbose/tedious than it needs to be. Most of the time, all you want is a function; very rarely do you want a fragment that is long lived and has mutable state, which is where classes/objects are really necessary.
-
Even using custom components gets tedious; at some scale, everything you pass into a component will be a structured Python value rather than a string, and you end up with code like
<component arg1="{value1}" arg2="{value2}" arg3="{value3}" arg4="{value4}" />. It's nice to have inbuilt/custom components behave uniformly, but you wonder what the XML syntax is really buying you other than forcing you to only use keyword-arguments and to wrap arguments in"{...}". - It's still XML! People spend a lot of time trying to get XML out of their templates; it seems odd to spend just as much time trying to put it into your source code.
Scalatags
And that's why I created Scalatags:
- Structured and immune to malformed output/XSS.
- No more one-template-per-file rule; make small templates to your heart's content!
- Dead-simple API, which re-uses 100% of what you know about Scala's language and libraries.
- 100% Scala syntax; no more bumping into weird edge cases with the parser.
- Syntax highlighting, error-highlighting, jump-to-definition, in-editor-documentation, and all the other nice IDE features out of the box. No more waiting for plugins!
-
Inbuilt and custom tags are uniformly just function calls (e.g.
div("hello world")) -
Custom components are trivial to create (
def component(x: Int, y: Int) = ...) and trivial to use (component(value1, value2)) because they're just functions. -
No dependencies! No need for SBT integration, filesystem loading, runtime compilation, caching, and all that jazz. You create a Scala object, call
.toString(), and that's it!
On top of fixing all the old problems, Scalatags targets some new ones:
-
Typesafe-ish access to HTML tags, attributes and CSS classes and styles. No more weird bugs due to typos like
flaot: leftor<dvi>. - Cross compiles to run on both JVM and Javascript via ScalaJS, which is a property few other engines (e.g. Mustache) have.
- Blazing fast
Scalatags is still a work in progress, but I think I've hit most of the pain points I was feeling with the old systems, and hope to continually improve it over time. Pull requests are welcome!
0.7.0
- Support for Scala 2.13.0 final
0.6.8
- Support for Scala 2.13.0-M5
0.6.7
- Experimental support for Scala Native
0.6.5
0.6.4
- To Scalatex 0.3.7
0.6.3
-
Add
fragandmodifierhelper methods to simplify Grouping Frags and Modifiers -
Tweak the syntax for defining CSS Stylesheets to avoid
problems with
.styleSheetTextbeing unreliable (147) -
Mark stylesheet tags in
CascadingStyleSheets asprotected[this], to avoid them polluting your autocomplete or leaking when you import from a stylesheet.
0.6.2
- Published for Scala 2.12.x
0.6.1
-
Scalatags' CSS Stylesheets has had many of its internals
marked as protected, so if you
import MyStyleSheet._you don't end up with as much trash polluting your namespace. -
Fixed #140:
Tagtype alias doesn't seem to work when writing cross-backend code
0.6.0
-
CSS Stylesheets API has been simplified; your stylesheets can
now be simple
objects, rather than needing to define traits and callSheet[...]on them -
Defining Custom Attributes, Styles, Tag Names has been changed
from
.attr,.tagand.styletoattr(...),tag(...)andcss(...) - About a 50% performance increase from #126, thanks to Rory Graves
- Updated scala-js-dom dependency to 0.9.1, thanks to Gabriel Bezerra
- Added raw attribute capability to let you render malformed XML, e.g. for AngularJS and friends, thanks to Mardo Del Cid
0.5.5
-
#100: Added
.emptyAttrwhich is shorthand for "someAttr".attr := "someAttr" according to https://www.w3.org/TR/2000/REC-xhtml1-20000126/#h-4.5, thanks to mdedetrich -
Fail fast when someone passes in a
nullto provide useful stack traces -
#112: add
enctypeattribute for forms -
#111: add the ability to namespace
Attrs
0.5.4
-
#106: Fixed imports from
import scalatags.Text.short._, thanks to stewSquared - #109: Improved initialization time for Scalatags package by making tag/attribute/style definitions lazy
0.5.3
- Camel-cased a large number of SVG tags so they match what is listed in the spec
- Merged example page into the readme
- Added the flex-box related styles
- Merged a bunch of PRs: 105, 103, 95, 94, 88
0.5.2
-
Made
maxHeight,maxWidth,minHeight, andminWidthintoPixelStylesso passing in an integer does the right thing.
0.5.1
-
Add
transitionstyle -
Add extension method
dom.Element#applyTags(mods: Modifier*)to easily apply Scalatags modifiers to existing elements.
0.5.0
-
First implementation of Scalatags
StyleSheets
0.4.6
- Attribute is now "min-width" instead of "minWidth"
-
Fixed typo in
borderRightStyle - Published for Scala.js 0.6.1
0.4.5
-
Fixed regression in definition of
JsDom.HtmlTagintroduced in 0.4.4
0.4.4
- Updated to scala-js-dom 0.8.0
-
Add missing SVG
spreadMethod -
()is now aFragrather than aModifer, rendering to"" - Added a ton of missing attribtues
0.4.2
- Added Javascript source maps that point to the Github sources.
0.4.1
-
Added basic
Namespacesupport, to allow for proper rendering of SVG elements in theJsDombackend -
Replaced unmaintained/untested
SvgStyleswith a semi-testedSvgAttrs -
Added
example/folder
0.4.0
-
Removed unused type param from
Frag -
Changed
bindNodefromModifier[dom.Element]toFrag[dom.Element, dom.Node]
0.3.9
- Better error messages for missing implicits
-
Added attribuets
method,role,content,httpEquiv,onkeyup,onkeypress -
Added implicit conversion from
Seq[Frag]toFrag
0.3.8
-
Added
Fragalias inBundle, to match all the other aliases per-bundle
0.3.7
-
Added
implicitsobject, for people who want to import all the implicit conversions/typeclasses without importing tags or other things
0.3.6
- Added unit test and readme-section to document making custom-bundles, to allow customizable single-import syntax to bring all the things you want into scope.
-
Deleted dead code in
Platform - Enforce lack of cycles between internal files
-
Removed
StyleValue[T: Numeric]andAttrValue[T: Numeric]in favor ofByte/Short/Int/etc. versions, to work around bug in type-inference in 2.10
0.3.5
-
Fixed a bug in
Textbackend that blew up when you had more than 8 attributes
0.3.4
-
Added a separate type parameter for
Frag.render, distinct from the type ofTypedTag.render, to more accurately type the API and allow the usage ofFrags on their own.